How to waterproof a water bottle in hide?
 Used since ancient times, with the name of otre (wineskin) it was the cheapest container, light weight, small size and unbreakable.
Usually made in leather and hide, in 1860 it was introduced in wood, and from 1912 in aluminium.
In time, a friend for the cyclists that filled up, emptied, grasped, thrown away and a lot of times passed over to the rival, today it’s become an accessory from sports people, to the tourists who more has more puts.
Did you ever ask yourself how water bottles are made in a way to be water proof?
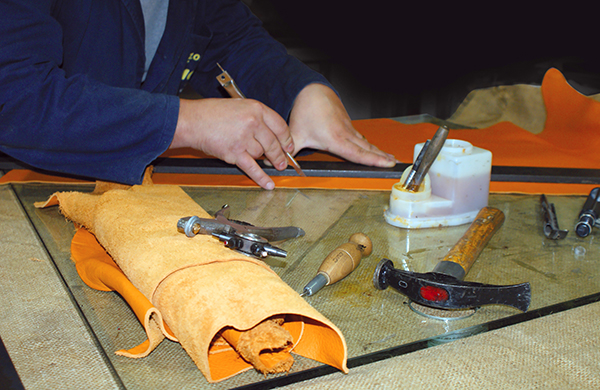
Following, we’ll try to understand how to make a water bottle, made in hide water proof, like the one you can see in the above photo made by Katja Zaccheo.
To help us there are suggestions from the experts in this sector on our facebook group “Lavorazione Artigianale Pelle e Cuoio”.
The most interesting way of making in natural hide a water bottle, water proof, is the one that proposes Katja Zaccheo, expert in historical reconstructions. The entire processing procedure makes use of the aid of natural techniques, in accord with the use of natural materials and instruments.
We will furnish you with the methods used by Zaccheo, a handbook to keep at hand, in case you would like to make this old style portable water container, with every single passage that is done by the craftsmen that work with leather and hide and curiosity related to this varied world.
Understand roughly what are the steps to accomplish any creation in leather and hide.
Model preparation
First thing you need, is a natural sheet of hide.
Prepare the model in hide of the water bottle that you have chosen, depending on which historical source you refer to.
The preparation of the model, hides a lot of design work that takes days.
The initial idea, which may be all new or taken from already made objects, it takes form in a paper model, that will be the first draft of the actual model; once made a trace of the shape of the paper model on the hide sheet, you proceed in cutting the various pieces.
It’s almost impossible, that the first draft will be the definite one. In fact the craftsman as he goes on will always make changes, on the form of the object, the dimensions and if needed, also in the working techniques.
In some cases, if the object already exists, you may find the model on line. For information regarding the paper model, visit the dedicated section in our blog.
Cutting the pieces
Once prepared the model, is the cutting of the pieces, that will put together your water bottle. If it’s the first time, you may find all you need in do-it-yourself stores. Make sure you have: cutter, scissors for hide, awl, metal ruler and punchers.
For the inexperienced, it’s hard to make a perfect cut the first time because, this operation is immediate, but very complicated because the cutter moves in irregular ways.
We suggest you to help yourself with the awl: pressing lightly and following the model line, made before with pencil, create a thin incision that will be a guide for the cutter. If the hide is very thick, don’t cut at first shot carve it a little at a time, repeating it until it is cut.
Following these suggestions, you will obtain a cut more or less regular.
Sewing the pieces
To sew all the pieces together of your water bottle it’s necessary to pierce every single part of the edges, helping yourself with the hole puncher, the tool to make holes in the hide.
The hide being a hard and compact material, to make the holes we suggest you to use a awl to mark the pilot points, to measure the distance with a ruler, to make holes later.
If you don’t want to measure the distances by hand, they sell seam wheels that will simplify the work.
To hand sew the hide you need a sewing needle specifically for leather, stronger and longer compared to the usual needles.
Usually it’s used a rounded tip needle and one with a thinner tip for the finishings.
The thread that is used for hand stitching is the waxed one, a string strong and compact. For example to sew a tolfa bag, you use a square hide string, it is obtained manually from leather sheets.
At this point we enter into the procedure of water proofing our water bottle, methods used and suggested by Katja Zaccheo.
Leather boiling
Some experts consider a real process of boiling, after all the pieces have been sewed. With this procedure the hide becomes more elastic ,until the water bottle does not deform within time.
Attention though, if you make it boil too much, the hide becomes too hard and it will shrink. The length of soaking time is variable, it must always, be checked on, or less you might risk to ruin your work. A correct procedure that you can use is to sand down very well the outside part(it must be similar to the inside one), put to boil in a pot the hide, soak it not more than five seconds and after wait a few seconds till it cools off( with your hands check that is not really cold), if you have to fold it , fold it on the side where it should be placed. Leave it to dry for five to ten minutes. Zuccheo instead, proceeds only with the immersion in hot water and to dry it, she puts it in the oven at a low temperature, following we will explain it to you.
Fill the water bottle with rice and put it in the oven
Zucceo suggests, after the immersion of the water bottle in hot water, remove it and fill it up with rice or lentils, helping yourself with a funnel and with the handle of a wooden ladle, pressin the rice or any other cereal, to give the water bottle a blotted form. After filling it at its maximum elasticity, put it in the oven, at low temperature to make it dry. This procedure permits the water bottle to maintain the blotted form, even after being emptied: in fact even squeezing it, it will always go back to the original form.
Empty it from the cereal and shake it well putting it upside down.
Some people, instead of rice use sand, it has a remarkable widening effect. Fill the hide sack with sand and press it down to compress it. After that follow the boiling procedure.
Pour the beewax
After empting the sack, pour the pure beeswax (previously warmed up in a little pot) inside helping yourself with a cone made out of waxed paper, this is what Zaccheo suggests. Turn the water bottle around to permit the beeswax to reach each part and to make it stick real good to all the stitches, so in the future there will not be any leaking, contained in the sack. After that pour the beeswax also on the outside and let it dry upside down.
What is beeswax and why is it used?
Beeswax is produced by eight ventral glands of the worker bees, but only on condition that the hive reaches a temperature of between 33° and 36°. With the increasing water temperature, the wax loses its aromatic odour.
The use of wax goes back at the times of the Egyptians, they used this natural resource, known for its water proof property, for the constructions of ships.
Nowadays its used to make candles, used especially in oriental Orthodox churches and in special events of Catholic Churches.
The beeswax prevents cracks, preserves the hide and it makes it soft and resistant.
It forms a water proof film for any kind of liquids, at the same time it protects it from dust and other kind of agents. Like our experts in this sector suggest, always on our facebook group, it could happen that honey or beeswax at contact with water, could give it a sweet taste but not disgusting, with time it may disappear.
For the construction of a water bottle, our experts in this sector, have proposed other natural materials.
It seems in fact, that in the past they used to use the innards of animals, for example the pigs bladder, for its elasticity. Ever since the Roman times, they used to make water bottles with the stomach and the innards of animals.
The pigs bladder, tells us Giorgio Martello Panno, is very elastic and it could contain up to almost 5 litres of water, but the only problem is, you must always keep it damp or else it loses its elasticity. You should always keep water in it to keep it always hydrated, to avoid any risk of any breakage once it’s dry. Many of you might think it’s not very hygienic to drink from a water bottle in leather or in hide. There is a solution, suggested by an expert in this sector Tvllia Rita, to conceal with leather or hide, a plastic or glass container. This way you are sure to drink, clean hygienic water.
Let’s summarize, the main passages of the Zaccheo method, to make waterproof a water bottle in hide:
Katja Zaccheo, Alessandro Salera,Cristiano Da Mont’Olmo, Francesco Nova, Eleonora Piccinini, Gianluigi Mignogna , Giorgio Martello Panno and Tvllia Rita, these are the names that have contributed to this article. They are all experts in the working of leather and of the hide, so we wish to thank them for their precious suggestions and contribution.
If you want to suggest us or have other curiosities, you can write to us at our e-mail (Object Blog: section tips and tricks) or else join us on our facebook group “Lavorazione Artigianale Pelle e Cuoio”.
If you want to be updated follow us in our social profiles....... MG Lavorazione Artigianale Pelle e Cuoio
 MG Lavorazione Artigianale Pelle e Cuoio
 @Mg_cuoio
 MG - Lavorazione Artigianale Pelle e Cuoio

")
Some books, and magazines dedicated to leather and hide and their craftsmanship.

What are the techniques craftsmen use?
In this section, an explanation on the methods that the masters in this field adapt when working with leather and hide.
A description on how cutting and sewing, our experts have produced some of their most interesting creations.

Different suggestions and useful information, to understand better this sector, and its various fields and why not, try to create your own leather object

This section is dedicated to news regarding curious and the extravagant world of leather and hide, for example the most strangest and bizarre techniques. The most unusual and extravagant work.

An online gallery with the most interesting, particular, extravagant and unique creations realized in the world, by craftsmen, artists or people who just do it for hobby, for profession or passion dedicate their time to working with this material.
A calendar with dates of the best manifestations, events, courses, fairs and other initiatives, related to the leather world, and leather promotions in Italy and Abroad.